Cleaning the tuning slide
- 1. Wrap a polishing gauze around the cleaning rod so that the metal is not exposed, and insert it to remove dirt from the interior of the inner and outer tuning slide. When you remove the cleaning rod, make sure there is no gauze left in the tube.
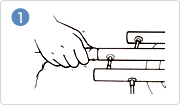
- 2. Use some gauze to clean dirt from the surface of the inner tuning slide, then apply a small amount of slide grease. This grease is for use on tuning slides only. Never use it on the slide. Slide the tuning slides back and forth several times to distribute the grease evenly.
If you used a hard stick type of grease there will little stretching, and the film may not be even. In this case it could dry out easily. If this worries you, try spreading soft type slide grease (soft) with your finger over the entire surface.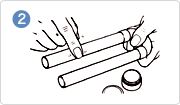
- 3. If the movement of the tuning slide is sluggish, there may be dirt, rust, or scratches on the surface of the inner tuning slide and outer tuning slide, or the tuning slide itself could be twisted (not parallel).
If you thoroughly clean the tuning surfaces with polishing gauze and apply slide grease and the movement is still sluggish, have the instrument inspected and repaired at a shop.
Advice
Valve oil is for pistons. Do not use it on the tuning slide.
Maintaining the rotary valve
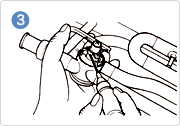
- 1. Apply some rotor oil to the rotary valve through the slide receiver end.
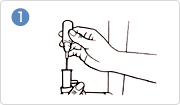
- 2. Remove the rotary valve cap and apply a small amount of rotor spindle oil to the center of the rotary valve and the area supporting the shaft.

- 3. Also apply small amounts of rotor spindle oil to the rotor rotation shaft and its receiver. After applying oil, close the valve cap and move the lever a few times to distribute the oil evenly.
- 4. Apply some lever oil to the lever support mechanism.

Advice
When using an oil nozzle, be careful to avoid making direct contact with the rotor, as the tip of the nozzle is made of metal.
The tip of the oil bottle is made of metal, so be very careful that it does not make direct contact with the rotor.
For more information, refer to the section of oiling the rotary valve on the horn page.
Other care and maintenance
Cleaning the mouthpiece
Prepare a brass soap water solution. Mix 1 part brass soap with between 10 and 15 parts warm water (30°C to 40°C).
Soak the mouthpiece brush in the solution, then use the brush to clean the mouthpiece’s throat. Finally, rinse the mouthpiece thoroughly with clean water.
Cleaning small parts
Don’t forget to clean the small parts of your instrument. Use a piece of gauze twisted into a string to do so.
Cleaning the water key hole
If the water key hole is dirty, use some tone hole cleaner to clean it.
]]>
t’s so important to keep your saxophone clean and hygienic – now more than ever! Here’s a step-by-step on how to clean a saxophone after each practice session.
Keep Your Saxophone Clean and Playing its Best
We’ve all heard stories of sax players becoming ill because they never clean their saxophones. So it’s important to do some basic maintenance to keep your sax clean and safe to play.
Plus, cleaning your sax will help to keep it working properly and sounding great!
A Warning
Don’t be tempted to take your sax apart to clean it. Even if you can put it back together, it might not play as well. Leave that to the experts.
When should you clean your sax?
It’s a great idea to get into the habit of cleaning your sax after each practice session or rehearsal, before you put it back into its case.
A warning: Don’t be tempted to take your sax apart to clean it. Even if you can put it back together, it might not play as well. Leave that to the experts.
What You Need
Though you can get a saxophone cleaning kit (which contains a mouthpiece brush, thumb rest, cleaning cloth, cork grease, key oil, and random color cloths), there’s no need to buy one yet. You can just use a pull-through swab and an old toothbrush to clean your sax.
I like to use a pull-through saxophone cleaning swab like this one. There’s a smaller lint-free cloth for the mouthpiece and neck and a larger polishing cloth for the body. They come in two sizes, for tenor or alto saxophone. They’re great for absorbing moisture inside your sax, and you can also use it to polish your sax. Throw the swabs in the washing machine when they need freshening up!
Some people use a padsaver which you leave inside your sax when you’re not playing it. Make sure you choose a good quality one so it doesn’t shed fibres inside your saxophone. The disadvantage with these is that they keep moisture inside your sax, which isn’t good for the pads.
How to Clean Your Sax
It’s the same process for tenor and alto saxophones.
Watch my video to see how I use my cleaning swab to clean the body of the saxophone. Take care that your swab doesn’t get stuck inside! It should gently pull through easily.
To clean the mouthpiece and neck, start by taking off the ligature and the reed. Watch the video below to see how I use the smaller swab to clean the mouthpiece and neck.Keep Your Saxophone Clean and Playing its Best
We’ve all heard stories of sax players becoming ill because they never clean their saxophones. So it’s important to do some basic maintenance to keep your sax clean and safe to play.
Plus, cleaning your sax will help to keep it working properly and sounding great!
A Warning
Don’t be tempted to take your sax apart to clean it. Even if you can put it back together, it might not play a
Use your swabs to polish the outside of your sax and neck, too, to keep it looking great. You can give your mouthpiece an extra deep clean by running it under cold water and cleaning it with an old toothbrush. Never use warm or hot water on your mouthpiece.
]]>Use care when assembling the instrument!
Apply cork grease to the joint of the neck before assembly. When assembling, please be careful not to put pressure on the neck or keys.
How to set down a saxophone
Soprano saxophones are usually laid down with the thumb rest up, and the main keys facing downward. There is a stable position that it can rest in, so try it out and see if you can find it.
After-performance care
Musical Instrument Guide:Saxophone Contents
Origins
- The birth of the saxophone
- The saxophone family
- Uses of the saxophone
Structure
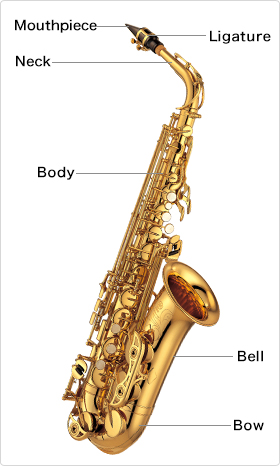
- Learn the names of the parts
- What is the reed?
- The saxophone is a conical-bored instrument
- Jazz saxophones and classical saxophones
- [Experiment1]What is the relation of the taper to the tone?
- [Experiment2]What happens when the length of the instrument changes?
How to Play
- The basic position
- The saxophone is a transposing instrument
- Control your breathing
- Embouchure
- Various performance techniques
How the Instrument is Made
- What metal is used to make a saxophone?
- Making the bell
- Making the bow
- Assembling the bell and the bow
- Making the body
- Making the neck
- Assembly, finishing, and, at last, complete!
Choosing an Instrument
- How to choose a reed and mouthpiece
- A beginner instrument
Care and Maintenance
- Assembling the instrument
- After-performance care
- Weekly maintenance
- Occasional maintenance
- Troubleshooting
Proper saxophone maintenance ensures optimal performance and prevents costly repairs. This article covers everything you need to know on how to take care of your saxophone.
Skip to a Section:
Daily Care
[Video] Daily Saxophone Maintenance Steps – Full Walkthrough
Properly Storing the Saxophone Between Uses
Reed Care
Periodic Care
Daily Saxophone Care
The most important part of saxophone maintenance is daily care, or care each time you play. Let’s talk about what you’ll be doing almost every time you pick up the saxophone:
- Playing prep (before playing). Rinse your mouth with water to avoid blowing any remnant food or drink particles into your instrument. Or if you can, avoid eating or drinking anything other than water before you play. Food and sugary drinks of any kind will cause bacteria growth inside the saxophone, leading to sticky keys and other messes. Trust us, you do not want this mess!
- Apply cork grease (before playing). Before putting the mouthpiece on the saxophone, check the neck cork. If the cork feels dry to the touch or if the saxophone mouthpiece does not slide over the cork easily, apply a light layer of cork grease. This helps condition the saxophone cork so it stays soft enough to do its job well for many, many years.
- Swab the saxophone (after playing). When you’re ready to put the saxophone back in the case, you’ll need to swab your saxophone using a saxophone-specific swab (see swab choices here). Saxophone swabs are essentially pieces of absorbent cloth attached to a weighted string. Pulling the swab through the saxophone helps collect and remove the dripping moisture left inside the sax. Swab cleaning your saxophone is vital to help keep your key pads from becoming waterlogged, sticky, and rotten.
- Dry the key pads (after playing). Dry off any additional moisture inside the saxophone by blowing dripping moisture off the keys. In particular, check out the palm keys (high D and up), as that’s where moisture most commonly collects.
You’ll also want to use a pad dryer (like this) to dab and dry the key pads (the soft leather pad underneath the keys). This specific saxophone care step will help prevent your keys from sticking and help prevent sticky brass oxidation from forming on the raw brass edges of the metal tone holes. You want to keep your saxophone’s pads and tone holes dry and clean.
[Video] Daily Saxophone Maintenance Steps – Full Walkthrough
This video walks you through all of the steps above to show you exactly what to do:
Properly Storing the Saxophone Between Uses
Believe it or not, the way you store your saxophone in the case is part of proper saxophone care and maintenance, and if not done correctly, it can cause significant disrepair in a short time. Here’s what you need to know about storing the saxophone:
- Use a saxophone end cap! The end cap (or end plug) is a small, usually plastic cap that fits into the end of the saxophone body before going in the case. The primary damage that occurs from not using the end cap is that the exposed octave key post gets damaged from moving around inside the case and can bend, rendering it dysfunctional.

All saxophones come with an end cap, but if you don’t have one or want additional protection, consider investing in a GapCap saxophone cap. What do we mean by additional protection? Surprisingly, the end cap that came with your saxophone may not fit well enough to prevent movement of the saxophone inside the case, and movement inside the case leaves wiggle room for sax whiplash if the case gets a huge hit or impact. A quick way to test this is to lay your sax down inside the case with the end cap on, then wiggle the sax all around to see if the sax moves against the case padding. If it does, your saxophone may not be stable enough inside the sax case to protect the instrument. The GapCap sax cap helps remove any loose fitting gap inside your case with adjustable ends for a custom fit with your saxophone neck socket and saxophone case. There are other benefits to using a GapCap sax cap. It was the first saxophone end cap designed to give shock absorption if your sax case takes a bad fall or hit, and the open end of the design allows for more airflow inside the horn, which helps prevent buildup and helps prevent sticky keys (we’ll talk about that next).
- Prop open problematic keys to prevent gunk buildup and sticky keys. Have you ever heard of sticky saxophone keys? If you haven’t experienced it yet, you likely will at some point. But you can significantly reduce your chances with one quick and easy step.
Sticky keys on the saxophone can cause everything from mild frustration to utter embarrassment. There’s nothing like trying to play a G sharp, but the key sticks and plays G natural instead. Ouch! (G sharp is one of the most common sticky keys).
Key Leaves sax key props and Vent Vine for saxophone gently keep the most stick-prone keys safely open inside your case while storing. Keeping sax keys open prevents buildup inside the saxophone (on the saxophone tone holes) from gunking up your key pads.
You can learn more about how Key Leaves work here. - Never lay your saxophone case lid side down.
Most saxophone lids close down over the saxophone keys where the tone holes are facing up. So, if you lay your case down on the lid, you are turning the saxophone so all the tone holes face down and drip any humidity directly onto the saxophone pads. That’s bad for the longevity and health of your saxophone. This is an easy thing to avoid.
Pro Tip: For best saxophone storage health, set your saxophone case vertically so the bow rests near the floor. That means any moisture left inside the saxophone has to work even harder to drip toward the delicate leather key pads.
The violin is an expensive, rather delicate instrument. Therefore, it’s important for beginners to understand basic instrument care tips and techniques that will maintain both its beauty and its sound quality.
How do you maintain a violin?
Violins are delicate instruments — it’s important for beginners to be aware of basic violin maintenance tips and techniques that will maintain its beauty, sound quality & value.
All musical instruments need to be properly taken care of in order to preserve their beauty and sound. In this article we present some essential violin maintenance tips for beginners so they may properly take care of their instrument.
Storing your Violin

The first step in effective violin care is proper storage. A good quality hard case is an important measure to protect it from damage.
Violins are delicate to fluctuations in temperature and humidity. If they’re kept in a high humidity environment, the top and bottom plates will expand causing the sound post to collapse.
Violins should be kept in as constant humidity and temperature as possible, which is why they should be stored in places that are neither too hot nor too cold!
Shoulder Rests and Rosin

In order to prevent damage, it’s important that you’re using the correct shoulder rest. The material must be durable enough for your violin and your playing style (some people like a more padded one while others prefer a flatter support).
If your shoulder rest is too high, you will experience buzzing when playing and that can create some serious damage over time if not attended to promptly.
Violin rosin is another crucial element in playing and needs to be reapplied often. The amount of rosin you use will vary depending on the humidity, so make sure to keep an eye on it!
Clean it after every use
The best way to clean a violin is with a dry, soft cloth. Avoid using cleaning products very often, as they can damage the varnish.
Varnish on a violin is quite delicate. The varnish on acoustic instruments has a significant impact on the sound of the instrument. As a result, it’s critical to clean any excess rosin, dust, fingerprints and your skin’s natural oils after each usage.
Clean the violin strings with a string cleaner and a separate cloth either in spray or liquid form. This will help remove dirt, dust, and other particles that can build up on the strings and affect their sound quality. Strings will last longer if you remember to do this regularly.
NEVER use water on your instrument! If you have any doubt about how to proceed, make sure to contact a professional for advice.
Keep it simple
Violins are delicate instruments, so avoid using any harsh chemicals or cleaners. It’s recommended to use a soft cotton cloth and wipe the instrument with care using only mild soap water solution.
It’s best not to expose your violin for long periods of time in direct sunlight as this can affect its varnish!
Check the setup regularly

Don’t forget to regularly check if the violin bridge is in its correct position for stability and alignment.
Instrument setup is a critical part of maintaining your violin sounding as good as possible. The bridge, strings, and sound post are all important elements that need to be aligned and stabilized in order to produce the best sound. If any of these elements are out of place, it can cause the violin to sound muted, muffled lacking in bass or too bright.
]]>Make sure to have your instrument setup by a professional every few months in order to ensure optimal sound quality!