
Guides
Beginner’s Guide for How to Set Up a Drum Set

Feb
Experienced drummers know that how you arrange your drum kit has a direct effect on how you play and what you can do. However, learning how to set up your drum kit can be as challenging as actually playing, especially for beginner drummers! At the MARVIN EMPIRE, we teach musicians the fine points of drumming, from advanced drum techniques to proper drum set posture, so you can play better, avoid injury and sound your best.
How to set up a drum set
When setting up your drum set, you’ll want to change how you arrange your drums based on the number of pieces you’re dealing with. Typically, most beginners start with a 4-piece or 5-piece drum setup, but many musicians add additional components to their as their skills improve.
1. Identify the 3 main parts of your drum kit
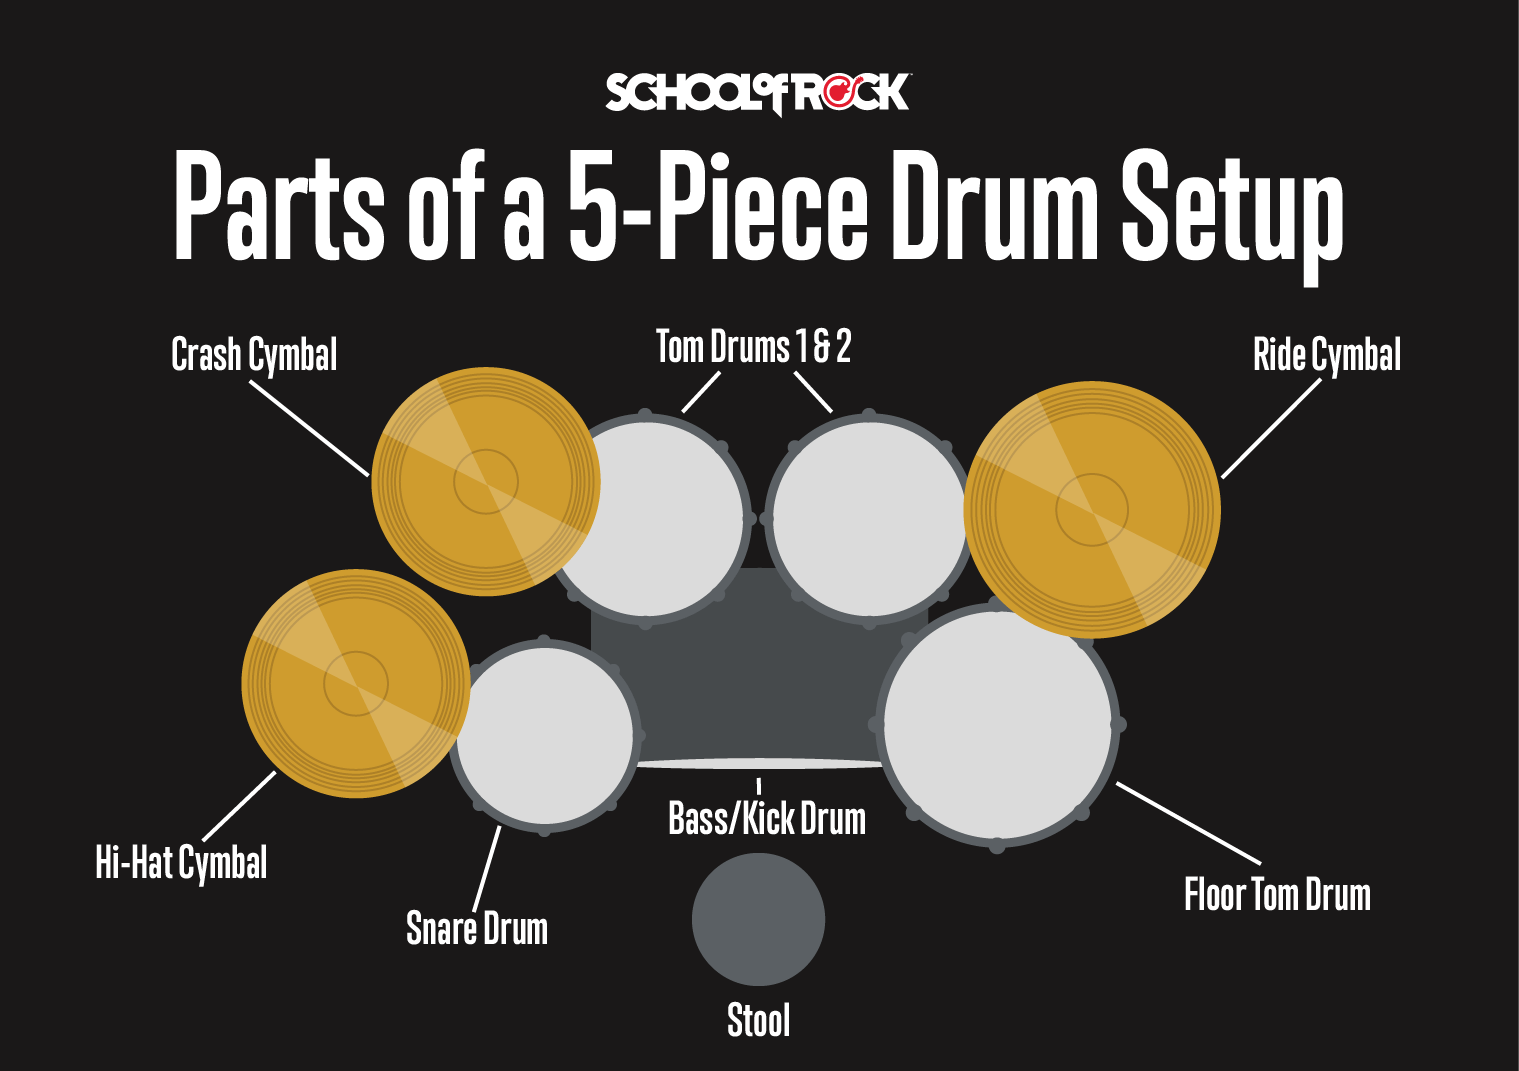
Most beginner drum sets have three main components: drums, hardware and cymbals.
- Drums. Most drum sets typically include the bass (or kick) drum, the snare drum and toms.
- Hardware. Common drum hardware includes the bass drum pedal, the throne, and the hi-hat and cymbal stands.
- Cymbals. Different types of cymbals include the crash, the ride and the hi-hats.
2. Set up your bass drum
Place your bass or kick drum so that it’s at the center of your drum kit. Note that your bass drum has adjustable legs. These are used to anchor your bass drum to the floor so it doesn’t move around as you play.
For this reason, it’s important to adjust the legs so they are equal on both sides, since unequal legs will cause your drum set to wobble during play. Check the tips of the legs on your bass drum to make sure they dig into the floor and prevent your drum from sliding around.
3. Adjust your bass drum pedal
When setting up your drum set for the first time, pay special attention to the bass pedal. You can find the bass drum pedal attached to the hoop of your bass drum. As you step on the pedal, the beater should strike the bass drum head in the middle of your drum and then bounce back.
If stepping on the pedal is too hard or makes your legs tired, then you’ll need to adjust the action or tension of the bass pedal to make it less tight. If the pedal stays on the drum head and does not bounce back, then the tension is too loose.
If the tension is too loose, you’ll need to adjust the tension to be tighter so the drum head springs back. Most pedals have a knob or screw that you can turn to control the tension, but this may be different depending on your model.
3. Place your snare drum
As you arrange your drum kit, you will need to adjust the height of your snare drum. The height of your snare drum should be set a few inches above your leg and set so you can easily hit the drum with either of your hands without hitting the rim of your drum.
Set up your drum so your snare throw-off, the lever that engages the snare, is on the left-hand side of your drum. Most drummers set up their snares flat, although traditional players sometimes set their drums so that it slightly tilts down and away.
4. Set up your toms
Most drum sets have two types of toms: floor toms and mounted toms. Your floor toms should be set so it is roughly the same height as your snare drum, while your mounted tom (or toms) should be set up at a slight angle towards you.
The arrangement of your toms can be changed to make it easier to play. For drum arrangements with more than one mounted tom, you can place your toms so they are a few inches apart and sit at equal angles.
If it’s uncomfortable to hit your floor tom, try angling the tom slightly toward you. You may find that angling your toms will be more comfortable than setting them up completely flat, although this can vary depending on the height of your drum throne.
5. Place your drum throne
The drum throne is where you will sit as you play. For increased playability, place your drum throne in a spot where you can reach all components of your drum set. This will allow you to play with the least effort and help you prevent injury.
6. Set up your hi-hat
When sitting at your drum set, the positioning of your hi-hat should be just to the left of your snare. You attach hi-hat cymbals to the rod of your stand using a clutch that secures the top cymbal to the rod. This allows you to open and close the hi-hats. Make sure that the pedal for your hi-hat is in a position where your foot can comfortably reach it.
It’s important that your hi-hat cymbals sit higher than your snare. Setting your hi-hats to the same height as your snare, or lower, might make it harder to hit.
7. Arrange your crash and ride cymbals
Typically, most drummers use one or two crash cymbals and one ride cymbal. Your ride cymbal should be set up to your right, usually just over the floor tom.
If you’re using one crash cymbal, set it up to the left of your kit somewhere between your snare drum and your mounted tom.
If you’re using a second crash cymbal, you should place it between your mounted tom and your floor tom. Make sure both crash cymbals sit a few inches above the mounted toms, but not too high. You’ll want to keep them within a comfortable reach.